A short circuit happens when there's a power diversion due to unintended contact of components. This, in turn, results in lower resistance than that of a standard circuit. When this happens, the power source is likely to be damaged.
As such, it helps to know how to find a short circuit using a multimeter, which basically can measure several parameters, including voltage, resistance, and continuity.
In short circuit tests, the critical parameter to check is continuity, which is the transfer of a charge from one end of a wire to the other end. If there is no continuity, then the wire has a "short." The test helps you to find the location of the "short" without dismantling the whole system.
In this post, we're going to share some exciting tips on how to find a short circuit with a multimeter. We hope by the end of the post, you'll able to carry out the task without any difficulty.
Steps to Finding a Short Circuit
It can be overwhelming when your circuit breaker keeps tripping repeatedly. Also, when the circuit is activated, it tends to make a loud popping sound, which can be annoying. So, when a short occurs, it's necessary to locate it and address it right away to avoid the circuit becoming damaged.
Some cases can also result in electrical fires if ignored.
Here are the crucial steps you can follow now to find the short:
1. Turn the Power Off
Before any electrical work on an outlet receptacle, your safety should come first. Be sure to turn the power off to the circuit at the circuit breaker. You can make sure the power is off by using the tester. Just insert the two probes of the tester into the vertical slots on the receptacle.
The tester will light if the circuit has power. Because there's a possibility of a split-wire in the outlet, always check both halves of the circuit before working on the receptacle. It's also advisable to check the ground system property to ensure it's connected to the receptacle.
2. Set the Multimeter to Continuity or Resistance
Whether you're using an analog or digital meter, you should be able to set the parameter to continuity or resistance. Use the selector knob to change the setting.
Bear in mind that not all multimeters have both resistance and continuity parameters. Standard meters don't come with a continuity parameter. If it's not provided, it's advisable to set the parameter to resistance, which is a standard parameter is most devices. However, if your meter has a continuity parameter, you can use it instead.
Also, note the settings for resistance. Some multimeters have a range of settings for this parameter. If yours has several, be sure to select the lowest resistance scale on the meter.
The continuity test helps you to determine the number of ohms at both ends of the wire. If both ends have different amounts, then there is a short.
3. Test the Probes
Make sure your multimeter is working correctly. You'll need to touch the probe tips together to observe the resistance or continuity readings. If the multimeter is working correctly, the resistance reading will be about zero.
On the other hand, you should be able to hear a tone or see a flashing light when testing continuity. If your multimeter has different approaches for testing these parameters, be sure to check the user manual.
4. Locate the Affected Circuit
You also need to locate the circuit component you want to test for a short. You're able to identify the circuit if the resistance reading is almost zero. This is not a normal reading for circuits. Typically, a circuit should have several hundred ohms.
Knowing there is a short is sometimes easy. For example, if there's no voltage at your HVAC unit's thermostat, then there's probably a short. In some cases, the signs of a short can be a smell of burning wires or a subtle popping sound from your system.
Common physical signs of a short include visible burns on wires, burning smells, hot spots, sizzling sounds, and flickering lights. If you have an infrared camera, you can also use it to inspect for hot spots if they are in walls or locations that are inaccessible.
5. Test the Circuit
Testing is usually a recommended step if you think there's a short, but you're not sure. Or, you can conduct the test after a job just to ensure every circuit is working correctly.
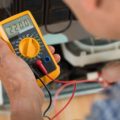
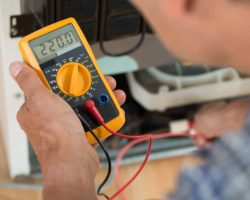
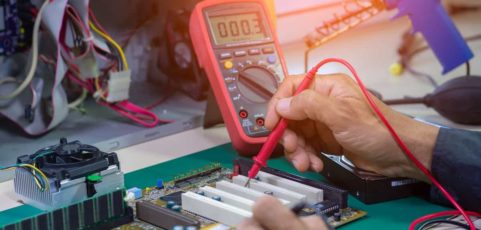
You should be able to see that your multimeter has red and black probes. Touch the black probe to the chassis of the circuit, or the electrical ground. The red probe should touch the parts that you suspect have a problem. Keep in mind that the tips of the probe must touch the metal components of the circuit to get an accurate reading.
While placing the red probe on the different parts of the circuit, be sure to monitor the readings on the display or scale. If the resistance is high, this means there's an open circuit. If the resistance is very low, say 2 ohms or less, then there is a short. Check the area or wires for frays and breaks if the value is very low.
If you're using a meter that has a continuity setting, a flashing light, or a beeping sound, that means there's a short.
6. Repair the Short
If you can find the location of the short and you have experience in dealing with electricals, you can fix the problem yourself. In some cases, the solution is as simple as replacing wires or insulating the wire to avoid unwanted contact. Remember to shut off the power or unplug the device while working to fix the problem.
Otherwise, be sure to hire an electrician to address the problem if you lack adequate knowledge and experience to fix the issue. It's easy to make mistakes, such as poor connections, when you attempt to fix the problem without prior experience.
Essential Tips for Using a Multimeter
Finding a short requires basic knowledge of using multimeters. Keep in mind that there are analog and digital meters, and it helps to know how to use them. In this section, we'll explore the standard features on a multimeter and help you understand the standard parameters.
Multimeters combine three critical features: voltmeter, ohmmeter, and ammeter. In some cases, they also include continuity. Apart from helping you find a short, a multimeter can also help you understand the performance of your circuits. Ideally, whenever there's something wrong with your circuits, a multimeter can help you with troubleshooting.
The device helps you know if the switch is on or the wires are broken. It is also effective in determining the amount of current flowing through wires. You can use it to determine the amount of power left on your batteries, too.
Choose the Right Device
As noted before, there are different types of multimeters, and each might have various features. Typically, more advanced multimeters have more features and attachments; thus, they'll cost you more.
Very basic meters measure only three parameters: current, voltage, and resistance. However, they tend not to last longer, and it's possible to get inaccurate readings. The best multimeter for you depends on what you want to use it for and your budget.
Basically, there are lots of options under $50, and all you have to do is to compare the features and design to pick one that suits you.
Familiarize Yourself with the Features and Parts
Your multimeter will come with a user manual to help you understand the device in detail. You have to know the display, selection knob, ports, and probes. If you buy an analog multimeter, it will have a scale and a pointer instead of an LCD.
The LCD displays the results of your tests, and the knob allows you to select what you want to measure. You'll plug the probes in the ports, which can be up to four ports. The probes are usually two; one is black, and the other is red.
Keep in mind that there is no difference between the two probes; it's just the color. The most important aspect is the color. The black probe connects to the COM port while the red one connects any other remaining three ports depending on what you want to measure.
Understand the Ports on Your Device
As noted before, the "COM" port is where the black probe is connected, and that's a conventional practice. There are three other ports, which are for the red probe. Your use of these ports depends on what you want to test. Here are the ports and what they're used for:
- VΩ - This port lets you test resistance, voltage, and continuity
- µAmA - You'll use this port to measure current
- 10A - If you want to measure large currents, say 200mA or more, this is the port to use
Bear in mind that these ports are not standard. They can vary depending on the multimeter you have. This is just to give you a clear overview of the different ports you might see on a multimeter.
How to Measure Voltage
This is probably the common test that people perform using a multimeter. You can use the device to measure AC or DC voltage. In most multimeters, a straight line is used to indicate DC voltage, while a wavy line indicates AC voltage.
So, when you want to measure voltage, then set the mode to the voltage type you want to measure: V with a straight light or V with a wavy line. Ensure the red probe is inserted in the port with a V adjacent to it, and the black one should be in the COM port.
Then, touch the red probe tip to the positive side of the component you're testing. This is where the current is coming from. The black probe tip should touch the negative side. You should then read your display to see results.
A Typical Measuring Example
To help you understand the process better, let's use a typical example of testing the voltage of a 1.5V battery. Since batteries come with the voltage already indicated, you know what to expect. So, you should select a range that can read the 1.5 voltage. A good range can be about 2V depending on your multimeter.
If you don't know the range to select, you should try different ranges until you get the right one. Choosing a lower range than the real value will give you "1" as the reading on the LCD. "1" means the voltage of the battery is higher than the range you've set. If you select a higher range, you can read the voltage, but it's likely to be inaccurate.
However, if your multimeter supports auto-ranging, you don't need to worry about the range to select. The device will automatically do it for you.
Final Thoughts
Well, at this point, we hope you're familiar with how to find a short circuit with a multimeter. This guide is ideal for beginners who want to understand how to carry out basic electrical tasks.
Today, we increasingly depend on electricity to run a lot of things in our home. But with most things, you're likely to encounter problems with your electricals. For some people, the first step is usually to call an electrician, which is undoubtedly a wise thing to do.
But for others, such problems offer an opportunity to put their electricity knowledge in use. Thanks to the growing availability of multimeters, you can easily find one to use at home or work. A multimeter allows you to find short circuits and address the problem before it even worsens.
Take the time to find the right multimeter that suits your needs. The market offers a wide range of options, from basic devices to high-end options. If you plan to use the meter for advanced tasks, then a high-end meter can be a great option. Such options come with great features, including Bluetooth connectivity and graphical functionality, to deliver the optimal experience in measuring different functions.